라이트맵은3DCG에서 빛의 방향과 세기에 따라 생성되는 빛을 받는 오브젝트의 그림자, 반사면, 면의 밝기 차이 등의 라이팅 정보를 사전에 저장하는 텍스쳐를 뜻한다.
플레이어가 바라보는 시야 및 씬의 환경 배치, 광원의 수와 조도 등에 따라서 화면에 출력되는 빛은 시시각각 다르게 보여지게 되며 이를 시각적으로 처리하는 연산에는 빛의 입자 정보를 일일히 따져보아야 하는 상당한 부하가 수반된다.
게임같은 경우, 빛을 계산하는 것이 컨텐츠의 전부가 아니기 때문에 라이팅에서 컴퓨팅 비용을 많이 사용하게 되면 게임플레이 코드 처리나 물리 연산 등에서 활용할 수 있는 자원이 줄어든다. 때문에 최대한 효율적으로 빛을 처리하고 다른 부분에서의 퍼포먼스도 보장하기 위하여 고안된 방법이 바로 라이트 정보를 미리 오브젝트의 텍스쳐에 '라이트맵'이라는 별도의 채널로 저장하여 마치 빛을 받고있는 듯 보이게 하는 라이트맵 방식이다. 이를 흔히 업계에서는 '라이트맵을 굽는다' 고 표현한다.
즉 요약 하면 실시간으로 빛에 의한 변화를 계산하기에는 엄청난 연산과 비용을 요구하기 때문에 이를 미리 계산하여 정보를 가지고 있는 하나의 텍스쳐를 이용해서 빛이 존재하는것처럼 효과를 준다는 정도로 이해하면 될 듯 하다.
우선 충돌이 일어나기 위해서는 두 GameObject가 모두 Collider를 가지고 있어야 하며 둘 중 하나는 Rigidbody를 가지고 있어야 한다.
두 GameObject중 하나만 움직인다면 움직이는 GameObject가 Rigidbody를 가지고 있어야 한다.
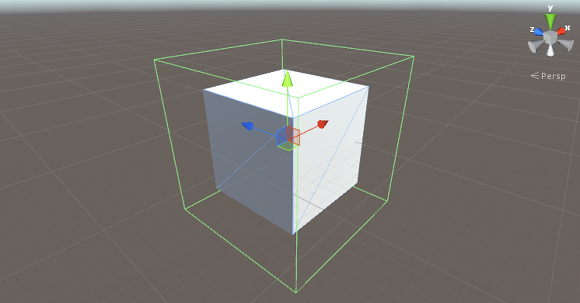
위 그림은 Collider가 잘 보이게 하기 위해 GameObject보다 크기를 약간 키워 보았다. 위에서 보이는 초록색 부분이 Collider로 실제로 충돌을 감지하는 영역이다.
Unity에서 제공하는 Object들에는 기본적으로 Collider가 들어가 있으며 Box Collider, Sphere Collider, Capsule Collider 등이 있다. 만약 다른 Model을 불러와 작업한다면 Model에 알맞게 Collider를 설정해 주어야 올바른 충돌처리를 할 수 있다.
- Trigger
Trigger는 GameObject간의 물리적 연산을 하지 않고 충돌을 감지할 수 있다. 즉, 두 GameObject가 접촉했을때 서로 튕겨 나가지않고 그냥 통과하게 된다.
Trigger를 쓰기 위해서는 해당 Collider의 Is Trigger 항목을 체크해야 한다.
2장 표준에서 사용할 수 있는 에디터 확장기능 이미 유니티 상에서 준비되어 있는 Attribute를 사용하면 편하고 자유롭게 커스터마이즈 할수 있음. 2.1 인스펙터의 외관을 변경 (1) Range
좌측은 기본상태, 우측이 Range를 사용해 변경한 상태.
using UnityEngine;
using System.Collections;

public class NewBehaviourScript : MonoBehaviour
{
    [Range(1, 10)]
    public int num1;

    [Range(1, 10)]
    public float num2;

    [Range(1, 10)]
    public long num3;

    [Range(1, 10)]
    public double num4;
}
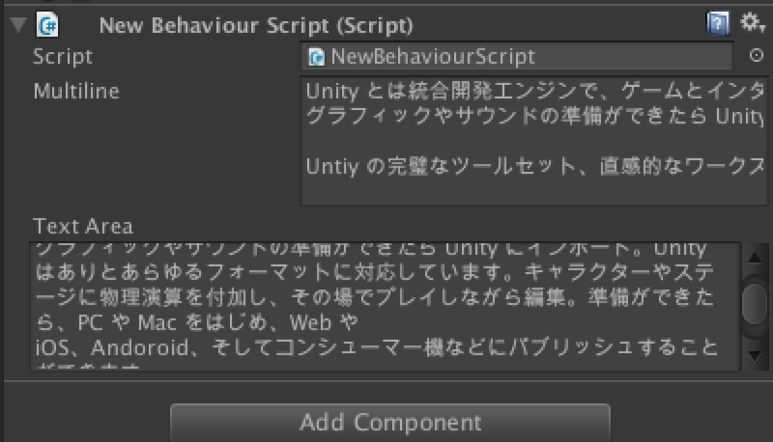
(2) Multiline / TextArea 기본적으로 1줄짜리 TextField인데, 여러줄의 TextArea로 변경할 수 있음. Multiline도 TextArea랑 별 차이 없는데, Multiline은 폭에 맞춰 자동적으로 줄바꿈되지 않고, 스크롤 바를 표시하지 않음. 특별한 이유가 없으면 TextArea를 사용하는걸 추천.
using UnityEngine;
using System.Collections;

public class NewBehaviourScript : MonoBehaviour
{
    [Multiline(5)]
    public string multiline;

    [TextArea(3, 5)]
    public string textArea;
}
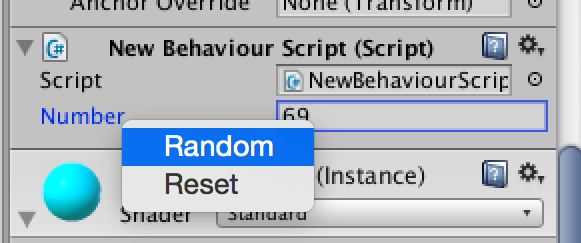
2.2 인스펙터에서 다루는 기능을 추가 (1) ContextMenuItem 인스펙터에 표시되어 있는 변수에 콘텍스트 메뉴를 추가함. 다른 변수들도 일제히 수치를 변경하지 않으면 안되거나, 순서가 필요한 요소를 자동화하는 용도로 사용하면 될듯. 컴포넌트 단위로 수치를 리셋시키는 Reset 기능은 있지만 각 변수에 대한 리셋 기능은 없으므로 이걸로 추가하면 됨.
using UnityEngine;

public class NewBehaviourScript : MonoBehaviour
{
    [ContextMenuItem ("Random", "RandomNumber")]
    [ContextMenuItem ("Reset", "ResetNumber")]
    public int number;

    void RandomNumber ()
    {
        number = Random.Range (0, 100);
    }

    void ResetNumber ()
    {
        number = 0;
    }
}
(2) ColorUsage 색의 변경을 위한 컬러 픽커를 사용함. 알파값 사용/미사용, HDR 용 등으로 설정.
using UnityEngine;

public class NewBehaviourScript : MonoBehaviour
{
    public Color color1;

    [ColorUsage (false)]
    public Color color2;

    [ColorUsage (true, true, 0, 8, 0.125f, 3)]
    public Color color3;
}
using UnityEngine;
using System;

public class NewBehaviourScript : MonoBehaviour
{
    [Header("Player Settings")]
    public Player player;

    [Serializable]
    public class Player
    {
        public string name;

        [Range(1,100)]
        public int hp;
    }

    [Header("Game Settings")]
    public Color background;
}
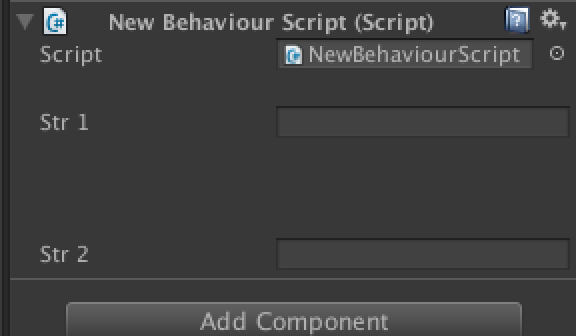
(2) Space : 말그대로 공백. 줄 띄워씀.
using UnityEngine;

public class NewBehaviourScript : MonoBehaviour
{
    [Space(16)]
    public string str1;

    [Space(48)]
    public string str2;
}
(3) Tooltip 프로퍼티에 대한 설명을 인스펙터 상에서 확인하게 만들고 싶을때 사용.
using UnityEngine;

public class NewBehaviourScript : MonoBehaviour
{
    [Tooltip("これはツールチップです")]
    public long tooltip;
}
(4) HideInInspector : 본래 public인 변수는 인스턴스에 표시되지만, 이거 쓰면 표시 안됨.
using UnityEngine;

public class NewBehaviourScript : MonoBehaviour
{
    public string str1;

    [HideInInspector]
    public string str2;
}
2.4 인스펙터를 좀 편리하게 하자 (1) RequireComponent [특정 컴포넌트가 최소 1개는 Attach되어 있어야 한다]고 하는 제약을 거는 속성입니다. Animator와 관련된 스크립트를 작성할때, Animator 컴포넌트가 붙어있어야 한다고 제약을 건다든가. RequireComponent가 사용된 스크립트를 Attach하면 자동으로 RequireComponent로 지정한 컴포넌트도 Attach됨. 이미 Attach되어 있으면 아무것도 안함. 그리고 지정된 컴포넌트를 삭제하려고 하면 못한다고 표시뜸.
using UnityEngine;

[RequireComponent(typeof(Animator))]
public class NewBehaviourScript : MonoBehaviour
{
    Animator animator;

    void Awake ()
    {
        animator = GetComponent<Animator> ();
    }
}
(2) DisallowMultipleComponent 하나의 게임 오브젝트에 같은 컴포넌트를 여러개 Attach하는것을 금지하는 속성. 2개 이상 같은 컴포넌트 넣고 게임 실행하면 못한다고 표시뜸. 이 속성이 설정된 클래스를 상속한 클래스에도 이 속성이 적용됨.
using UnityEngine;

public class NewBehaviourScript : Base
{
}
using UnityEngine;

[DisallowMultipleComponent]
public class Base : MonoBehaviour
{
}
(3) FormerlySerializedAs 변수명을 변경했을때에 새로운 변수명에 데이터를 이동시키기 위한 속성. 인스펙터에 표시되듯이, Serialized된 데이터는 변수명을 경로로써 보존함. 이런 상태에서 변수명을 바꾸면 변수의 데이터는 초기화됨. 그래서 이런 문제를 회피하기 위한 속성. (역주 : using UnityEngine.Serialization; 추가해야함)
using UnityEngine;

public class NewBehaviourScript : MonoBehaviour
{
    [SerializeField]
    [FormerlySerializedAs("hoge")]
    string fuga;
}
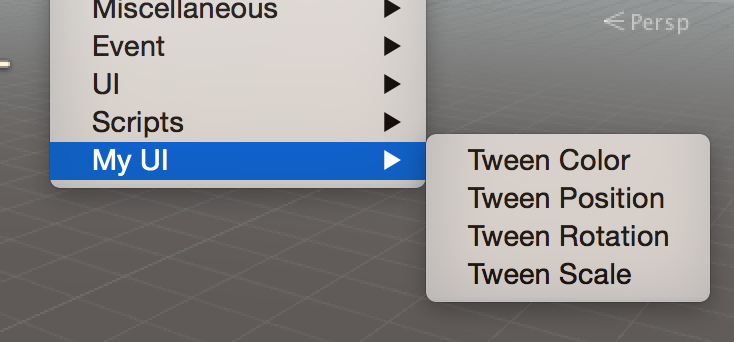
변수명의 변경과 FormerlySerializedAs 속성의 추가, oldName의 지정은 동시에 이루어져야함. 스크립트의 컴파일에 의해 필요없는 데이터는 파괴되어버림. 변수명 변경하고 한번 컴파일, 그러고 나서 속성 추가하고 oldName 지정해봐야 데이터는 이미 날아가고 없다는거. (4) AddComponentMenu Component 메뉴에 메뉴항목을 추가합니다. 스크립트는 모두 Component/Scripts 메뉴의 안에 정리되어 있음. 범용적인 스크립트 컴포넌트 군을 작성할 때, 하나의 카테고리에 정리하고 싶을때 사용. 그럴때 AddComponentMenu를 사용한 스크립트는 다른 장소에 메뉴가 작성되므로 Component/Scripts 메뉴 안에서 소거됩니다.
using UnityEngine;

[AddComponentMenu("MyUI/Tween Color")]
public class TweenColor : MonoBehaviour
{
}
2.5 게임 개발을 편하게 하자 (1) ExecuteInEditMode 게임 실행중이 아니어도 MonoBehaviour를 상속한 컴포넌트의 주요 함수가 호출되는 효과. 호출되는 타이밍은 게임 오브젝트가 갱신되는 때. 씬 Asset을 더블클릭해서, 씬을 로드할 때에는 Awake와 Start 함수가, 인스펙터 등에서 컴포넌트의 변수 등을 변경하면 Update가 호출됨. 또한, OnGUI 에서 설치된 GUI가 에디터의 GUI 렌더링 사이클을 돌면서 표시되는식.
using UnityEngine;

[ExecuteInEditMode]
public class NewBehaviourScript : MonoBehaviour
{
    [Range(0,10)]
    public int number;

    void Awake ()
    {
        Debug.Log ("Awake");
    }

    void Start ()
    {
        Debug.Log ("Start");
    }

    void Update ()
    {
        Debug.Log ("Update");
    }
}
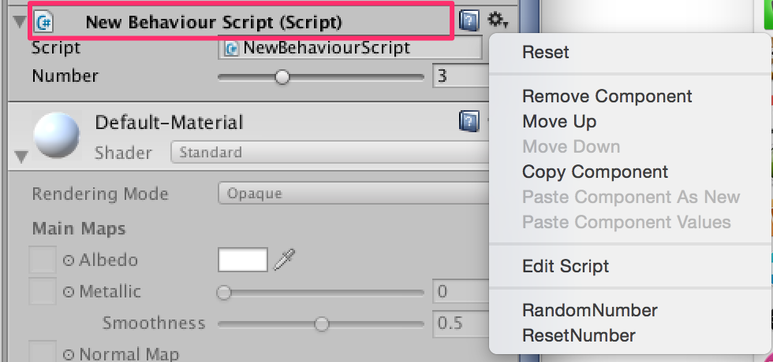
(2) ContextMenu 컴포넌트의 컨텍스트 메뉴에서 함수를 실행함. ContextMenuItem과 이름과 기능이 비슷하지만, 추가하는 컨텍스트 메뉴의 장소가 다름.
using UnityEngine;

public class NewBehaviourScript : MonoBehaviour
{
    [Range (0, 10)]
    public int number;

    [ContextMenu ("RandomNumber")]
    void RandomNumber ()
    {
        number = Random.Range (0, 100);
    }

    [ContextMenu ("ResetNumber")]
    void ResetNumber ()
    {
        number = 0;
    }
}
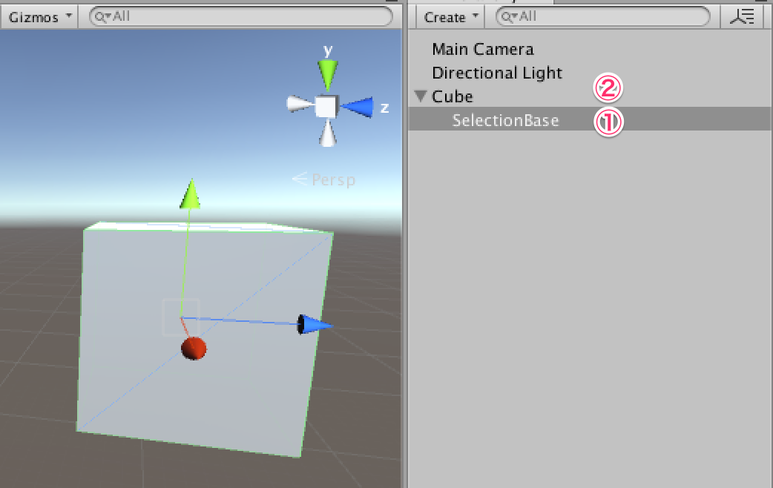
(3) SelectionBase 씬 뷰에서 오브젝트를 선택했을때 [선택된 게임 오브젝트를 지정]하거나 [게임 오브젝트의 선택 순서를 결정]할 때 사용합니다. 보통, 씬 뷰에서 오브젝트를 선택한 때에는 루트 게임 오브젝트가 선택됨.
원래 Cube를 클릭하면 Cube만 선택되는데, 자식 오브젝트에 SelectionBase를 붙이면, Cube를 클릭했을때 자식 오브젝트부터 먼저 선택되는 효과.
using UnityEngine;

[SelectionBase]
public class NewBehaviourScript : MonoBehaviour
{
}
Editor폴더는 에디터 API를 사용하기 위한 특별한 폴더. 보통 에디터 API는, 런타임으로 동작하지 않음. 아래 코드를 Assets 폴더 바로 아래에 작성해서 빌드해보면 빌드 실패 뜸.
using UnityEngine;
using UnityEditor;

public class NewBehaviourScript : MonoBehaviour
{
}
개발 중의 유니티 에디터 상에서 생성되는 Assembly-CSharp.dll에서는 UnityEditor.dll에의 참조가 발생하므로 스크립트의 컴파일 에러는 발생하지 않음. 빌드 시에 생성되는 Assembly-CSharp.dll에서는 UnityEditor.dll에의 참조가 발생하지 않기 때문에 빌드 에러가 발생하는것. 중요. 이거 몰라서 빌드 에러 원인 못찾고 그럼. UnityEditor에서는 Assembly-CSharp-Editor.dll을 생성해서, 에디터 API와 런타임 API를 구분하는 것으로 문제를 해결함.Assembly-CSharp-Editor.dll는 빌드 시에는 포함되지 않으므로 빌드 에러도 발생 안함. 그리고 Assembly-CSharp-Editor.dll은 Editor 폴더 안의 스크립트 파일이 컴파일 되어 생성되는것. Editor 폴더의 생성장소는 별 제한 없음. 여러개의 Editor 폴더를 생성할수도 있음. 단, Standard Assets, Pro Standard Assets, Plugins 폴더 안에 생성하면 그 안의 스크립트는 Assembly-CSharp-Editor-firstpass.dll에 컴파일됨. Assembly-CSharp-Editor.dll에서 firstpass를 참조할수는 있지만 firstpass에서Assembly-CSharp-Editor.dll를 참조할수는 없음. 주의. [Editor 폴더에 포함 안시키고 동작시키는 방법] 런타임에서 동작하는 스크립트에 에디터 API 꺼를 사용하는 겨우가 있음. 이 경우에는 아래와같이 처리할것.
using UnityEngine;

#if UNITY_EDITOR
using UnityEditor;
#endif

public class NewBehaviourScript : MonoBehaviour
{
    void OnEnable ()
    {
        #if UNITY_EDITOR
        EditorWindow.GetWindow<ExampleWindow> ();
        #endif
    }
}
1.2 Editor Default Resources 폴더 Resources 폴더랑 마찬가지로 에디터 확장에서만 사용할 리소스를 넣어둘 수 있는 폴더임. Editor Default Resources 폴더 안에 있는 에셋은 EditorGUIUtility.Load로 접근 가능.
var tex = EditorGUIUtility.Load ("logo.png") as Texture;
10장 PropertyDrawer 예를들어, 캐릭터를 위한 스크립트가 있고, 히트포인트의 hp 변수가 있다고 합시다.
using UnityEngine;

public class Example : MonoBehaviour
{
    [SerializeField]
    int hp;
}
위의 코드는 SerializedField 속성이 붙어 있고, 인스펙터에 표시되게 되어 있습니다.
이 hp 변수에 다음의 제한이 걸려 있는 경우, 어떻게 하는게 좋을까요. - HP의 상한 하한은 정해져 있다. - 이 수치는 조정되지 않은 것으로, 수치를 변경하면서 적절한 수치를 찾아야 한다. 이들 제한(모양)은 개발할 때는 고려해야 하는 것으로, 특히 인스펙터에서 수치를 편집할 때는, 이러한 제한을 붙이는것은 표준 기능으로는 어렵습니다. 10.1 PropertyDrawer란 유니티는, Serialize된 데이터를 유니티가 자동판단해서 적절한 GUI를 사용해, 인스펙터에 표시합니다. PropertyDrawer는 그 유니티에 의한 자동판단 처리를 Hook해서 스스로 GUI를 사용하기 위한 기술입니다. 이것을 통해 특정 GUI만을 커스터마이즈 할 수 있습니다. 인스펙터에 표시되는 컴포넌트의 GUI를 변경하기 위해서는 CustomEditor가 적절합니다. 하지만, 이것은 컴포넌트 전체의 커스터마이즈입니다. 지금은, 컴포넌트의 일부인 hp 변수(프로퍼티)만을 커스터마이즈 하고 싶은것이므로 CustomEditor가 아니라 PropertyDrawer를 사용합니다.
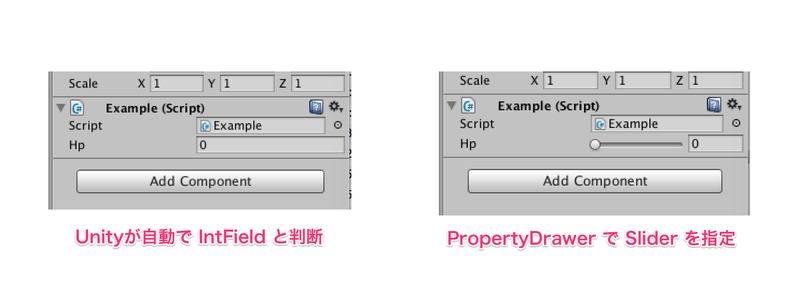
왼쪽은 유니티가 자동으로 IntField라고 판단했을 경우이고, 오른쪽은 PropertyDrawer로 Slider를 지정한 경우입니다. 예를들어 다음과 같이 Serialize 가능한 클래스가 있다고 합시다.
[Serializable]
public class Character
{
        [SerializeField]
        string name;

        [SerializeField]
        int hp;
}
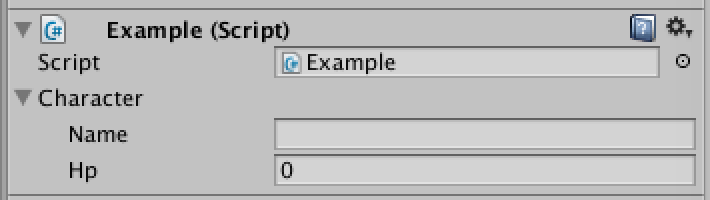
이것을 인스펙터로 표시하려고 하면 컴포넌트에는 있지만 실로 보기 힘들게 표시됩니다.
이것을 PropertyDrawer를 통해 GUI의 표시를 커스터마이즈해서, 1행에 표시시킬 수 있습니다.
이렇게 인스펙터의 조자에서 불편하다고 생각한 부분을 커스터마이즈해나갈수 있습니다. 10.2 PropertyAttribute PropertyAttribute는 단순히 Attribute를 상속한 클래스입니다. CustomEditor가 컴포넌트의 Editor 오브젝트를 확장하였듯이, PropertyDrawer는, PropertyAttribute를 확장합니다. (정확히 말해 PropertyAttribute가 붙은 Serialize 가능한 필드입니다).
using UnityEngine;

public class ExampleAttribute : PropertyAttribute
{
}
10.3 CustomPropertyDrawer 와 PropertyDrawer CustomEditor와 마찬가지인 구현방법으로, PropertyDrawer도 확장을 실행합니다. PropertyDrawer를 상속한 자식 클래스를 생성하고, 확장하고 싶은 클래스를 CustomPropertyDrawer의 인자에 넘깁니다. Serialize 가능한 클래스이면 아래의 클래스를 작성합니다.
[CustomPropertyDrawer (typeof(Character))]
public class CharacterDrawer : PropertyDrawer
{
}
PropertyAttribute의 자식 클래스의 경우도 같습니다.
using UnityEngine;
using UnityEditor;

[CustomPropertyDrawer (typeof(ExampleAttribute))]
public class ExampleDrawer : PropertyDrawer
{
}
남은것은 작성한 PropertyAttribute를 필드에 추가시키는 것 뿐입니다.
using UnityEngine;

public class Hoge : MonoBehaviour
{
    [SerializeField, Example]
    int hp;
}
10.4 RangeAtribute를 시험사기 이미 표준에서 몇개 정도 PropertyDrawer가 구현되어 있습니다. 그 중 하나인 RangeAttribute를 사용해 봅시다.
using UnityEngine;

public class Example : MonoBehaviour
{
    [SerializeField, Range (0, 10)]
    int hp;
}
속성으로써 Range(0, 10)을 추가하는것 뿐인데, 0부터 10까지 슬라이드 가능한 Slider를 작성할 수 있습니다.
using UnityEngine;

[System.AttributeUsage (System.AttributeTargets.Field,
                               Inherited = true, AllowMultiple = false)]
public class Range2Attribute : PropertyAttribute
{
    public readonly int min;
    public readonly int max;

    public Range2Attribute (int min, int max)
    {
        this.min = min;
        this.max = max;
    }
}
[Range2Drawer의 작성] 속성에 붙은 필드는 SerializedProperty를 경유해 다룹니다. propertyType이 int이면 IntSlider를 사용하고, int 이외라면 표준 GUI를 사용합니다.
using UnityEditor;
using UnityEngine;

[CustomPropertyDrawer (typeof(Range2Attribute))]
internal sealed class RangeDrawer : PropertyDrawer
{
    public override void OnGUI (Rect position,
                      SerializedProperty property, GUIContent label)
    {
        Range2Attribute range2 = (Range2Attribute)attribute;

        if (property.propertyType == SerializedPropertyType.Integer)
            EditorGUI.IntSlider (position, property, range2.min, range2.max, label);
        else
            EditorGUI.PropertyField (position, property, label);
    }
}
10.6 Range2Attribute를 사용하기 이상으로 구현이 끝났으므로 Range2Attribute를 사용해보았습니다. int 이외에서는 다룰 수 없는것을 확인하기 위해서 string에 대해서도 속성을 추가해보았습니다.
using UnityEngine;

public class Example : MonoBehaviour
{
    [SerializeField, Range2 (0, 10)]
    int hp;

    [SerializeField, Range2 (0, 10)]
    string str;
}
10.7 다양한 PropertyDrawer 유니티에 표준 구현되어 있는 것은 2장 [표준에서 사용하는 에디터 확장 기능]에서 소개해드렸습니다. 여기서는 제가 지금까지 작성한 PropertyDrawer를 소개하고자 합니다. [Angle] API로서 노브(손잡이)를 표시하는 EditorGUILayout.Knob가 있습니다. 하지만 PropertyDrawer에서는 EditorGUILayout의 사용이 금지되어 있어서 쓸 수 없습니다. 내부적으로는 EditorGUI.Knob이 구현되어 있어, 리플렉션을 사용해서 호출하는 것으로 사용이 가능하게 됩니다.
private readonly MethodInfo knobMethodInfo = typeof(EditorGUI).GetMethod("Knob",
       BindingFlags.Instance | BindingFlags.NonPublic | BindingFlags.Static);

private float Knob(Rect position, Vector2 knobSize,
                      float currentValue, float start,
                      float end, string unit,
                      Color backgroundColor, Color activeColor,
                      bool showValue)
{
    var controlID = GUIUtility.GetControlID("Knob".GetHashCode(),
                                              FocusType.Native, position);

    var invoke = knobMethodInfo.Invoke(null, new object[] {
        position, knobSize, currentValue,
        start, end, unit, backgroundColor,
        activeColor, showValue,
        controlID });
    return (float)(invoke ?? 0);
}
[GetPropertyHeight] GUI의 기본 높이값(EditorGUIUtility.singleLineHeight)을 변경하고 싶을 때는 GetPropertyHeight를 오버라이드 합니다.
[CustomPropertyDrawer(typeof(AngleAttribute))]
public class AngleDrawer : PropertyDrawer
{
  private AngleAttribute angleAttribute { get { return (AngleAttribute)attribute; } }

  public override void OnGUI (Rect position,
                    SerializedProperty property, GUIContent label)
  {
    //생략
  }

  //반환값으로써 반환된 값이 GUI의 높이로써 사용됩니다
  public override float GetPropertyHeight(SerializedProperty property,
                                                            GUIContent label)
  {
      var height = base.GetPropertyHeight(property, label);

      var floatType = property.propertyType != SerializedPropertyType.Float;

      return floatType ? height : angleAttribute.knobSize + 4;
  }
}
[AnimatorParameter] Animator 윈도우에 있는 파라메터 이름을 타입 상관없이 필드에 Attach할 수 있습니다. 얻어올 수 있는 파라메터는 같은 게임 오브젝트에 Attach되어 있는 Animator Controller의 파라메터가 됩니다.
using UnityEngine;

[RequireComponent(typeof(Animator))]
public class AnimatorParameterExample : MonoBehaviour
{
    //모든 타입의 파라메터를 얻어오기
    [AnimatorParameter]
    public string param;

    //Float만
    [AnimatorParameter(AnimatorParameterAttribute.ParameterType.Float)]
    public string floatParam;

    //Int만
    [AnimatorParameter(AnimatorParameterAttribute.ParameterType.Int)]
    public string intParam;

    //Bool만
    [AnimatorParameter(AnimatorParameterAttribute.ParameterType.Bool)]
    public string boolParam;

    //Trigger만
    [AnimatorParameter(AnimatorParameterAttribute.ParameterType.Trigger)]
    public string triggerParam;
}
[같은 오브젝트의 컴포넌트를 얻어오기] 이번에는 같은 게임오브젝트에 Attach되어 있는 Animator 컴포넌트로부터 AnimatorController를 얻어옵니다. 컴포넌트는 SerializedProperty->SerializedObject->Component의 순서로 얻어올 수 있습니다.
AnimatorController GetAnimatorController(SerializedProperty property)
{
    var component = property.serializedObject.targetObject as Component;

    if (component == null)
    {
        Debug.LogException(new InvalidCastException("Couldn't cast targetObject"));
    }

    var anim = component.GetComponent<Animator>();

    if (anim == null)
    {
        var exception = new MissingComponentException("Missing Aniamtor Component");
        Debug.LogException(exception);
        return null;
    }

    return anim.runtimeAnimatorController as AnimatorController;
}
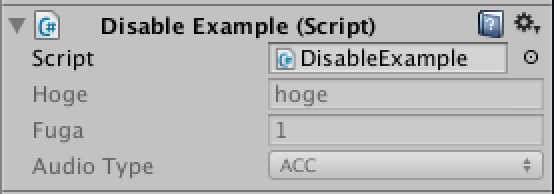
[DisableAttribute] 프로퍼티를 인스펙터 상에서 편집 못하게 막습니다. 인스펙터에 표시하고 싶은데, 수치를 변경시키고 싶지 않은 때에 사용합니다.
using UnityEngine;

public class DisableExample : MonoBehaviour
{
    [Disable]
    public string hoge = "hoge";

    [Disable]
    public int fuga = 1;

    [Disable]
    public AudioType audioType = AudioType.ACC;
}
구현 방법은 간단합니다. BeginDisabledGroup과 EndDisabledGroup, 혹은 DisabledGroupScope를 사용해 PropertyField를 감싸는 걸로 구현할 수 있습니다. 인스펙터에서 편집할 수 없게 되었다 해도, 인스펙터를 Debug 모드로 하면 편집할수 있고, 스크립트에서 수치의 편집이 가능하므로 주의해주세요.
using UnityEngine;

public class EnumLabelExample : MonoBehaviour
{
    public enum Example
    {
        [EnumLabel("テスト")]
        HIGH,
        [EnumLabel("その2")]
        LOW
    }

    [EnumLabel("例")]
    public Example test = Example.HIGH;
}
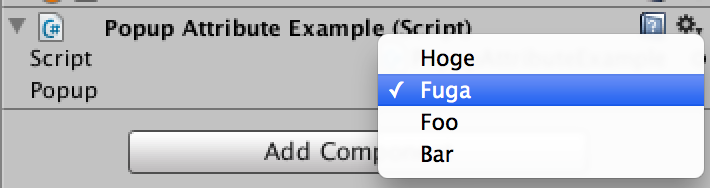
GUI를 표시할 때에 EnumLabel에 건네준 문자열을 사용해서 Popup을 표시합니다. 위의 예시같이 test 변수에도 속성을 붙이지 않으면 적용되지 않습니다. 이것은 PropertyAttribute가 필드에 붙어있지 않으면 이벤트가 발생하지 않기 때문입니다. [Popup] Attribute에 넘겨준 파라메터를 사용해 Popup을 표시합니다. 수치를 Popup으로 선택할 수 있게 됩니다.
using UnityEngine;
using System.Collections;

public class PopupExample : MonoBehaviour
{
    [Popup("Hoge","Fuga","Foo","Bar")]
    public string popup;

    [Popup(1,2,3,4,5,6)]
    public int popup2;

    [Popup(1.5f,2.3f,3.4f,4.5f,5.6f,6.7f)]
    public float popup3;
}
수치를 가진 쪽을 object로 하고 있으므로 다수의 타입을 지원합니다.
public class PopupAttribute : PropertyAttribute
{
    public object[] list;

    // 인자는 object 배열
    public PopupAttribute (params object[] list)
    {
        this.list = list;
    }
}
하지만 이렇게 하면 Popup에서 선택된 수치를 대입할 때에 조금 고생합니다. SerializedProperty에 수치를 대입하는 것은 property.stringValue, property.intValue, property.floatValue와 같이 각자의 변수에 대입해야 합니다. [PreviewTexture] 텍스쳐의 프리뷰를 표시합니다.
using UnityEngine;

public class PreviewTextureAttributeExample : MonoBehaviour
{
    //60초 캐쉬일것
    [PreviewTexture(60)]
    public string textureURL = "https://www.hogehoge.com/image.png";

    [PreviewTexture]
    public Texture hoge;
}
[텍스쳐 표시는 GUIStyle을 쓴다] 텍스쳐의 표시는 EditorGUI.DrawPreviewTextrue를 사용하고 있는데, PropertyDrawer에서는 렌더링 타이밍의 관계에서 텍스쳐가 표시/비표시되는것을 조절해버리는 문제가 발생합니다.이런 문제가 있어서 대안으로서 GUIStyle을 사용해서 스타일의 배경으로서 텍스쳐를 렌더링합니다.
SceneName : 유효한 씬 이름을 Popup으로 선택할 수 있습니다. Popup으로 표시되는 것은 Build Settings 의 Scene In Build에 포함되어 있는 씬 이름입니다.
using UnityEngine;

public class SceneNameExample : MonoBehaviour
{
    [SceneName]
    public string sceneName;

    //무효 상태의 씬을 표시합니다.
    [SceneName(false)]
    public string sceneName2;
}
[EditorBuildSettings.scenes에서 씬의 목록을 얻어오기] 씬은 EditorBuildSettings.scenes 변수에서 관리되고 있습니다. 단, Build Settings의 Scene In Build에 씬 등록되어 있지 않으면 목록에 포함되지 않기 때문에 주의해주세요.